* 이 포스트는 전 배달의민족, 현재 인프런에 계시고 유튜브 개발바닥의 크리에이터이신 개발자 이동욱님의 '스프링부트와 AWS로 혼자 구현하는 웹 서비스'를 기반으로 작성된 코드를 기반으로 진행중인 프로젝트에 대한 글임을 알립니다. 포스트 맨 아래에 관련 링크가 있습니다.
책 부분이 끝난 후부터는 코드를 커스텀하는 과정을 포스팅합니다.
책 부분이 궁금하시면 ready부터 보시길 추천합니다.
참고 : https://github.com/kth1017/S1
저번 포스트에 이어 이번에는 index.html을 조금 신경써서 꾸며보겠습니다. 코드는 위의 깃허브 링크에 있습니다.
1. 페이지 디자인
#예상 결과물
- 아마 index.html은 이렇게 구성될 것 같습니다.
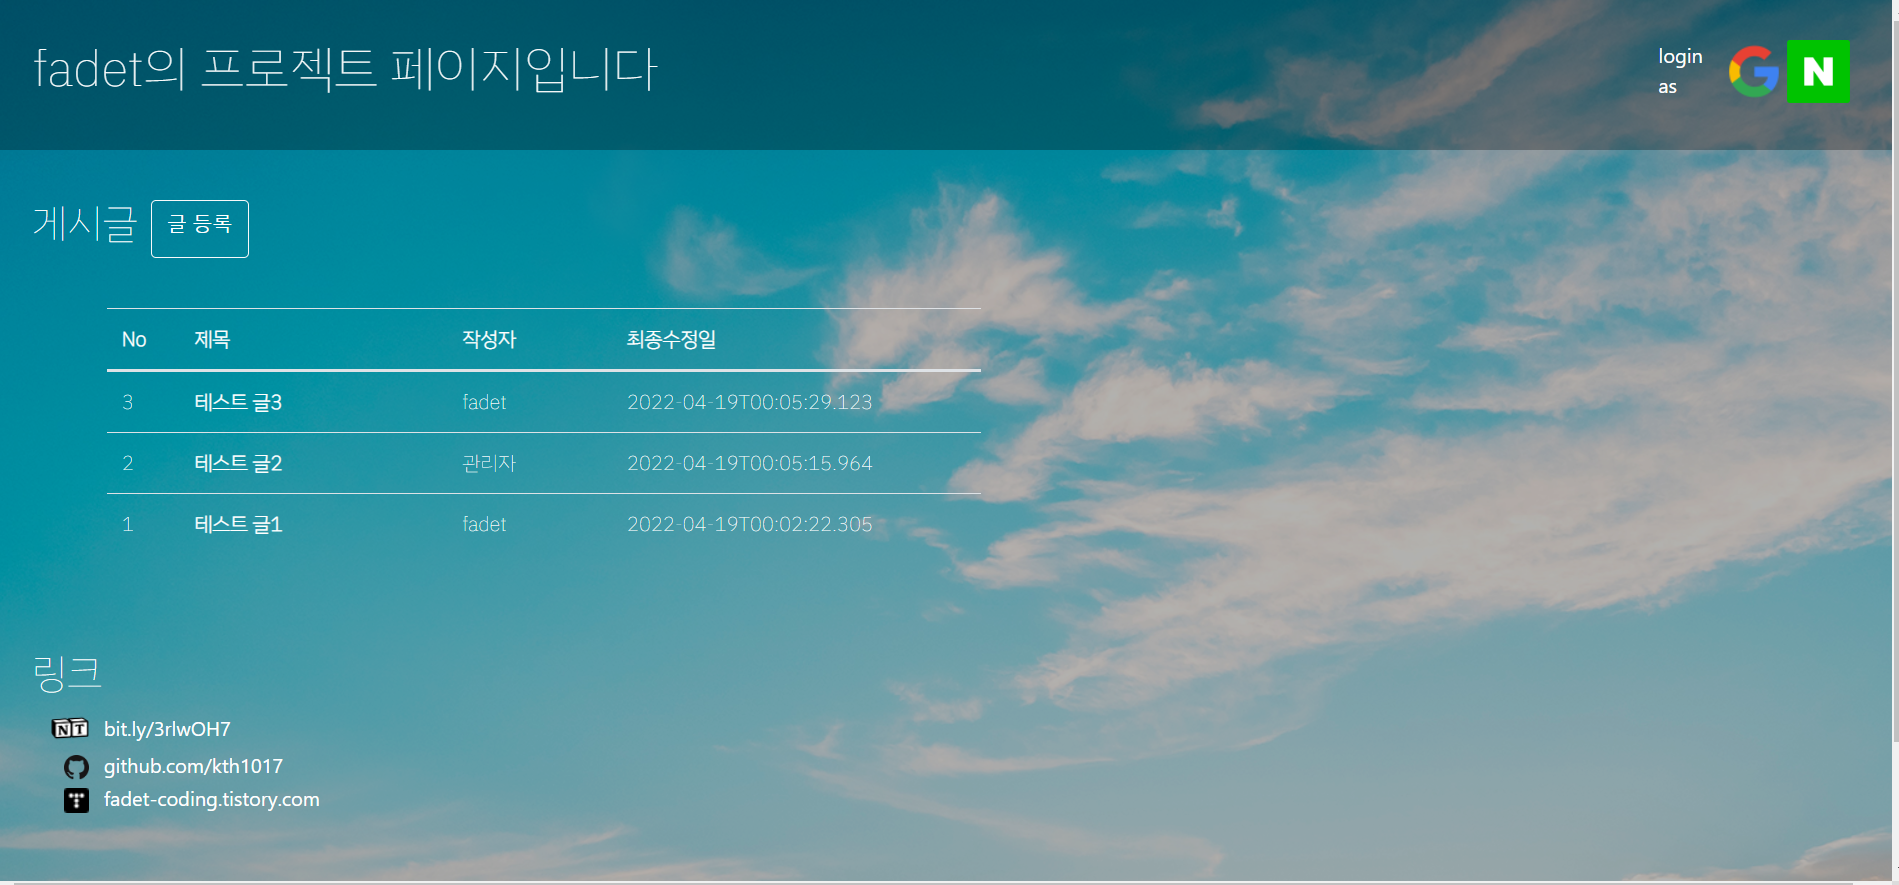
일단 제가 보기엔 빨리 만들 수 있는 페이지치고는 깔끔한 것 같습니다. 기능이 많다면야 좌측 사이드바도 고려하겠지만 아직은 아닌 것 같아 넣지 않았습니다.
2. html, css 분할
#파일 분리
- 저는 조금 길어질 것 같으면 css파일을 분리해서 이번 포스트에서 생성할 파일은 index.html, index.css 두 개입니다. css가 더 복잡해지면 더 분할하겠지만 아직 그 정도는 아닌 것 같네요. 전체 코드는 올릴 필요가 없을 것 같고 큰 골격만 올려두겠습니다.
3. index.html
#코드 작성
- 전체 코드를 요약하면 아래와 같고 조금 특이사항 몇 개만 언급하겠습니다.
/* index.html */
<!DOCTYPE HTML>
<html xmlns:th="http://www.thymeleaf.org">
<head>
    ...
</head>
<body>
    <header>
        <h1 class="title">fadet의 프로젝트 페이지입니다</h1>
        <nav>
            ...
        </nav>
    </header>
    <content>
        <p><br></p>
        <div style="display: flex">
        <h2 style="margin-right: 10px">게시글</h2><a href="/posts/save" role="button" class="btn btn-outline-light">글 등록</a>
        </div>
        <p><br></p>
        <div class="row">
            <div class="col-sm-6">
                <table class="table table-hover" style="color: white">
                    ...
                </table>
            </div>
        </div>
    </content>
    <footer>
        <h2>링크</h2>
        <table style="margin-left: 3%">
            ...
        </table>
    </footer>
</body>
</html>
/* index.css */
@import url('https://fonts.googleapis.com/css2?family=Nanum+Gothic&family=Roboto+Condensed:wght@300&display=swap');
@import url('https://fonts.googleapis.com/css2?family=IBM+Plex+Sans+KR:wght@100&display=swap');
/* body part */
body {
...
}
/* header part */
header{
...
}
/* content part */
content{
...
}
/* footer part */
footer{
...
}#<nav>
- 과거에는 float를 사용하곤 했었는데 저는 flexbox를 이용했습니다. css grid 등 다른 방법도 있는데 저는 이게 가장 편하더라구요.
header{
    display: flex;
    justify-content: space-between;
# content의 <table>
- 글 목록 table의 경우 부트스트랩의 table-hover를 이용했고 col-sm-6로 크기를 줄였습니다.
<div class="row">
    <div class="col-sm-6">
        <table class="table table-hover" style="color: white">
#반응형
- 그래도 메인페이지니까 브라우저의 세팅에 따라 페이지가 깨지면 좀 보기 흉하니 css를 몇 군데 손봤습니다.
body {
    ...
    background-repeat: no-repeat;
    background-size: cover;
    background-position: center;
}
header{
...
width: 100%;
height: 120px;
}content{
...
width: 100%;
min-height: 400px;
}이러면 페이지 크기를 스크롤로 조절해도 크게 깨지거나 하지 않습니다.
4. 테스트코드 수정
#IndexControllerTest
- 템플릿에 적용된 기존 테스트코드도 수정해줍니다.
@Test
public void 메인페이지_로딩() {
    //when
    String body = this.restTemplate.getForObject("/", String.class); // 왜 this를 씀?
    //then
    assertThat(body).contains("fadet의 프로젝트 페이지입니다");
}
5. ec2 배포 스크립트 수정
#deploy.sh
- 수정 내용의 경우 'custom' branch에서 진행하기에 github의 custom에 push되었습니다. 해당 커밋을 pull 해야하기 때문에 deploy.sh를 약간 수정해줍니다.
echo "> Git Pull"
git pull origin custom
refer
이동욱님 블로그의 관련 포스트 : https://jojoldu.tistory.com/539?category=717427
개발바닥 유튜브 :https://www.youtube.com/channel/UCSEOUzkGNCT_29EU_vnBYjg
개발바닥
본격 세계최초 DEV 엔터테인먼트 토크쇼 두 스타트업 개발자의 요절복통 이야기 구독 안하면 장애남!!
www.youtube.com
이동욱님 github의 해당 repository : https://github.com/jojoldu/freelec-springboot2-webservice
'Project' 카테고리의 다른 글
| P1_게시판 프로젝트_4_페이징 기능 추가 (0) | 2022.05.12 |
|---|---|
| P1_게시판 프로젝트_3_thymeleaf layout (0) | 2022.04.25 |
| P1_게시판 프로젝트_1_thymeleaf 시작 (0) | 2022.04.15 |
| P1_클론 프로젝트(feat. 스프링부트와 AWS로 혼자 구현하는 웹 서비스)_책 부분 End (0) | 2022.04.08 |
| P1_클론 프로젝트(feat. 스프링부트와 AWS로 혼자 구현하는 웹 서비스)_8 (0) | 2022.04.08 |